
A mixer grinder is one of the most commonly used appliances in Indian kitchens for all types of cooking requirements. However, with frequent use, the blades become dull, worn out, or damaged which could affect the grinding performance and efficiency. Let us see how to change blades in mixer grinder models while ensuring optimal performance, durability and longevity is retained.
Changing a blade may often appear as a technical task that can be completed in a few simple steps with the right precautions. Ensuring few simple steps are followed ensures safe use of the jar while preventing damage.
Regular inspection of the blade assembly helps identify wear before it affects performance. Timely replacement not only improves grinding consistency but also supports smoother operation and reduces unnecessary load on the motor.
How to Change Blade in Mixer Grinder: Preparation and Safe Removal
When planning to replace the blades, one must ensure the following:
1. Make sure the appliance is unplugged from the power source to ensure safe use of sharp objects.
2. Separate the jar with blade assembly from the mixer grinder appliance.
3. Clean the jar completely once detached to remove any food residue present. This helps with a smooth replacement process.
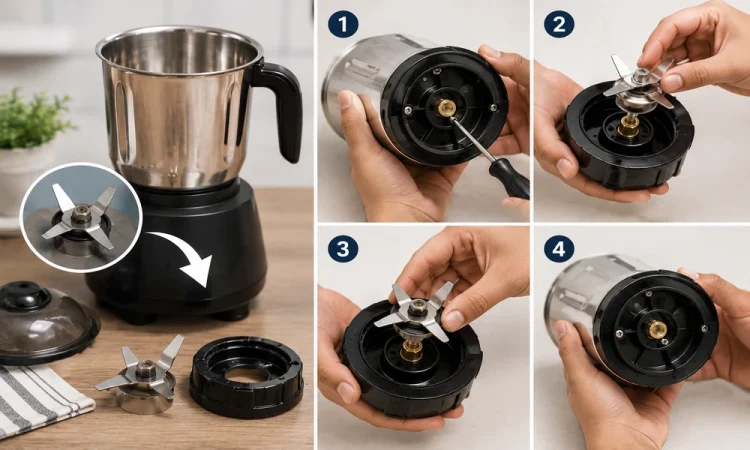
4. Few jars come with a locking nut beneath the jar. Use a suitable tool or wrench to loosen the assembly. Ensure the jar is held tightly when rotating the locking mechanism in the required direction.
5, The mixer grinder blade can be removed along with associated washers or gaskets once it’s loosened.
6. Check all components and their position when detaching the blade to ensure it is reinstalled at the right place during assembly.
7. Check for any signs of damage in the jar base, gasket, and locking mechanism to replace simultaneously. This helps prevent future leakage issues.
Installing and Testing the New Blade
Below is a guide on how to install a new blade while retaining the efficiency and effectiveness of the appliance.
Step 1: Installing the New Blade
It is important that the new mixer grinder blade is installed in the appropriate location as recommended by the manufacturer.
Step 2: Installing the Gasket
Place the gasket or seal in the allocated slot.
Step 3: Fixing the Blade Assembly
Fix the blade assembly securely without over-tightening it.
Step 4: Adjust the Blades
Move the blades around to adjust them so that it operates well.
Step 5: Replace the Jar
After installation of the new blades, put back the jar in its original position.
Conclusion
Knowing how to change the blade in a mixer grinder is important to ensure continual functioning of the mixer grinder with no disruptions. This also ensures efficiency and performance of the appliance is retained. With periodic replacement of worn blades, any strain on the appliance motor when preparing spices, chutneys, batters, and other ingredients can be reduced. This ensures longevity of the appliance. Renowned home appliance brands like Orpat provide thoughtfully designed mixer grinders that are convenient, sturdy and reliable for everyday cooking needs.


